utilizing rate Matrices for Account-Specific Pricing
Looking for a way to offer tailored rates to clients, incentivize loyalty, or reward high-volume bookings? By using stored account rates, you can keep your system organized and efficient while providing account-specific pricing.
Creating a Fixed Rate Matrix
- Navigate to the "My Office" icon in the navigation bar.
- Go to the "Rate Management" section from the menu.
- Select "Fixed Rates & Zones Setup" from the options on the left.
- Click on "Create New Rate Matrix."
- Provide a name for the new Rate Matrix in the "Enter New Rate Matrix Name" field (ex. 2025 Affiliate Rates).
- Hit "Create Matrix" to finalize and save your changes.
Adding Rates to a New Fixed Rate Matrix
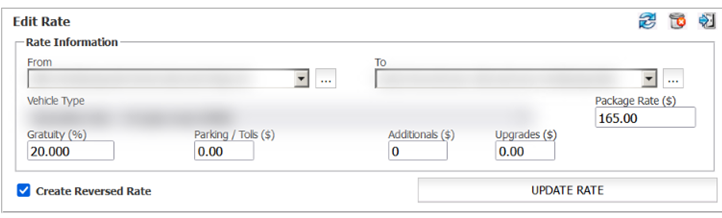
- Select the "From Zone" from the drop-down list.
- Choose the "To Zone" from the drop-down list.
- Pick the "Vehicle Type" from the drop-down list.
- Enter the rate amount in the "Rate($)" field.
- Add amounts for Tolls and Parking, if applicable to this rate.
- Enter percentage values for the "Tax 1" and "Tax 2" fields, if applicable.
- Check the box for "Create a Reversed Rate" if you wish to automatically create a reversed rate for the From/To Zones.
- Click "Add Rate" to save the entry.
Creating a Hourly Rate Matrix
- Navigate to the "My Office" icon in the navigation bar.
- Go to the "Company Resources" section from the menu.
- Select "Vehicle Types" from the options on the left.
- Select the Vehicle Type from the list that you want to create a rate for, then click “EDIT VEHICLE TYPE.”
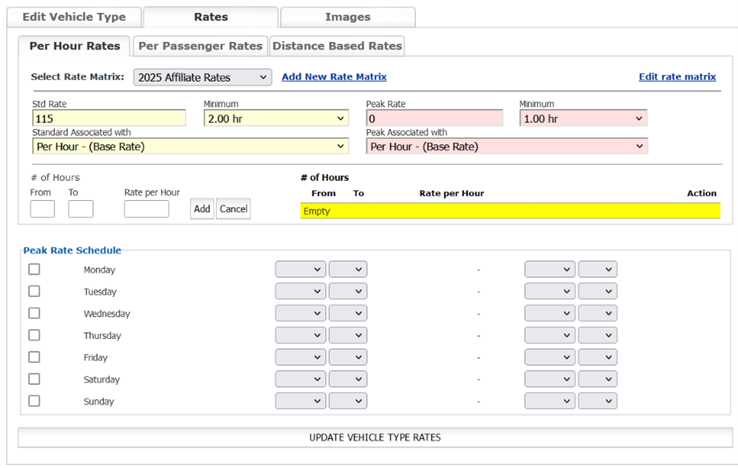
- Navigate to the “Rates” tab, then select the “Per Hour Rates” tab.
- Click “Add New Rate Matrix.”
- Enter a name for the new Hourly Rate Matrix in the "Enter New Rate Matrix Name" field (e.g., 2025 Affiliate Hourly Rates).
- Click "Create Matrix" to finalize and save your new Hourly Rate Matrix.
- Ensure the newly created matrix is selected in the “Select Rate Matrix” dropdown.
- Enter your hourly rate into the Std Rate field.
- Select the minimum number of hours from the “Minimum” dropdown.
- Click “UPDATE VEHICLE TYPE RATES” to save the new rates.
Applying Rate Matrices to an Account
- Navigate to the “Accounts” icon in the navigation bar.
- Search for the account you want to apply your rate matrices to. NOTE: Keep in mind whether the account is for a Billing Contact or a Passenger. If the Rate Matrix is applied to a Passenger account, it will only apply to that specific Passenger. If applied to a Billing Contact, the Rate Matrix will apply to all Passengers tied to that contact—unless a Passenger account has its own matrix applied. To apply a Rate Matrix across an entire company with multiple Billing Contacts, you’ll need to apply the matrix to each Billing Contact individually.
- Open the account and go to the “Financial Data” tab.
- Scroll to the Stored Rate Matrix section.
- Select the appropriate matrices from the respective dropdown.
- Click the “Save” button at the bottom of the page to apply account changes.

After applying a Rate Matrix to an account, the assigned rates will automatically populate based on trip details:
- In the Online Reservation System (ORES): Rates will appear if the client books trips directly.
- In the Limo Anywhere Core System: Rates are displayed when you click the Apply Rate button in a reservation—provided the trip matches the parameters of the Rate Matrix.
Note: This differs from manually entered Account Rates, which only appear in the Account Rates tab.
Have feedback or suggestions? We’d love to hear from you! Share your ideas with our Product Team at ProductTeam@LimoAnywhere.com. Need assistance setting up these features? Our Support Team is here to help—call us at 888-888-0302 Ext. 2 or email Support@LimoAnywhere.com.
Recent Posts

Drive Growth in 2025: Proven Strategies to Take Your Limo Business to the Next Level
Wednesday April 16, 2025
Simplify Your Bookings and Delight Customers with the Passenger Web App (PWA)
Wednesday April 9, 2025