Setting Up Account-Specific Scheduled messages
With Limo Anywhere’s scheduled messaging templates, operators can effortlessly set up customized messages that automatically send based on specific trip statuses. These templates are fully customizable to meet the unique needs of your clients, including the ability to create account-specific messages. This helps save time and ensures that important details are shared quickly and accurately with bookers, billers, or passengers—whatever your communication needs may be. In this blog, we’ll walk you through the benefits of using account-specific scheduled messages in Limo Anywhere, how to create and tailor them to your business, and some common examples to get you started.
Creating Scheduled Messaging Templates
- Click the “My Office” icon in the navigation bar.
- Select “Messaging & Template Settings” from the left-hand menu.
- Navigate to the “Scheduled Messaging” tab.
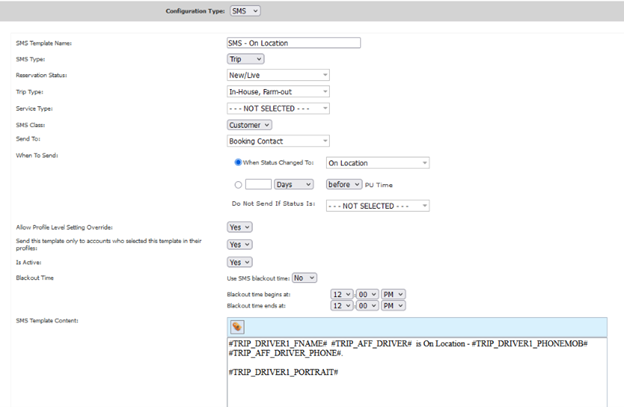
- Select Email or SMS from the Configuration Type drop-down menu.
- Click ‘Add New Template’.
- Name your template in the Email or SMS Template Name field.
- Choose ‘Trip’ from the Type drop-down (while you can also create messages for invoices, we’ll focus on trips in this blog).
- From the Reservation Status drop-down, select ‘New/Live’.
- Choose ‘Select All’ for both the Trip Type and Service Type, or select specific ones (for example, select ‘Prom’ if you're sending a message related to that service).
- In the Email or SMS Class field, select ‘Customer’.
- Specify whether this template should be sent to the Billing Contact, Passenger, and/or Booking Contact.
- Set your When To Send criteria. Messages can be sent when the trip updates to a certain status or messages can be sent based on a certain number of Days, Hours, or Minutes before or after the pick up time.
- Choose whether to allow profile-level overrides and set the template to be available only for accounts that have selected it. NOTE: This is the setting that allows you to send account-specific scheduled messaging rather than globally applying a notification.
- Ensure the Is Active setting is enabled (or disabled if you wish to deactivate it without deleting it).
- For SMS notifications, set up blackout periods as needed.
- Create your template content and insert the necessary HTML trip tags (ex. TRIP_CONFNUM# for trip confirmation).
Assigning Templates at the Account Level
- Click the “Accounts” icon in the navigation bar.
- Search for the account you want to update.
- Select the contact and click “Edit”.
- Once the account is open, navigate to the “Misc” tab.

- Choose the desired templates from the ‘Scheduled Email Rules for Account’ drop-down (only templates where you specified ‘Yes’ in Step 13 in the list above will be available in this drop-down)
- Click “Save” to apply changes.

Have feedback or suggestions? We’d love to hear from you! Share your ideas with our Product Team at ProductTeam@LimoAnywhere.com. Need assistance setting up these features? Our Support Team is here to help—call us at 888-888-0302 Ext. 2 or email Support@LimoAnywhere.com.
Recent Posts

Drive Growth in 2025: Proven Strategies to Take Your Limo Business to the Next Level
Wednesday April 16, 2025
Simplify Your Bookings and Delight Customers with the Passenger Web App (PWA)
Wednesday April 9, 2025