Setting Up Drivers in Limo Anywhere & DriverAnywhere

Proper driver setup goes beyond basic data entry—it’s a key step in onboarding your team and getting the most out of your Limo Anywhere system. Setting up drivers ensures smooth dispatch operations, accurate payroll processing, and seamless communication between your team and chauffeurs. In this blog post, we’ll walk you through setting up drivers as a resource in Limo Anywhere and configuring chauffeur’s DriverAnywhere access.
Adding Drivers to Limo Anywhere
- Click the “My Office” icon in the navigation bar.
- Navigate to the “Company Resources” tab.
- Select “Drivers” from the lefthand menu.
- Enter the chauffeur’s First and Last Names in the “Add New Driver” section.
- Enter the chauffeur’s cell phone number.
NOTE: The driver's full name and cell phone number are required, and you cannot set up a chauffeur in the system without this information. The other fields are optional and can be completed based on your company's preferences.
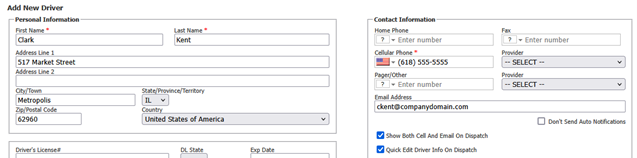
6. Complete other profile information as desired.
If you intend to set your driver up on DriverAnywhere, enter their Web Access credentials.
NOTE: Driver credentials must be unique, even if a driver has been inactivated. Use a format that reduces the likelihood of generating duplicate usernames (ex. Jack Smith and John Smith cannot both have the username JSmith).

7. Click “ADD NEW DRIVER” to save the driver’s information to your system.
8. Once the Driver has been added to Limo Anywhere, additional tabs will become available.
Understanding DriverAnywhere Settings

NOTE: Drivers do not have access to DriverAnywhere by default and DriverAnywhere settings are controlled per driver.
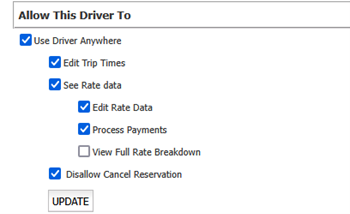
- To enable DriverAnywhere for the driver, check the box next to “Use Driver Anywhere.”
- Checking the box next to “Edit Trip Times” allows the driver to adjust times for Gar-Out, ETA, Spot, In-Car, Drop-off, and Gar-In.
- Checking the box next to “See Rate Data” grants the driver access to view the rates you’ve mapped for DriverAnywhere. By default, these rates include Tolls, Parking, Misc Fee 1, and Misc Fee 2.
- Checking the box next to “Edit Rate Data” allows the driver to modify rates or rate components (Tolls, Parking, Misc Fee 1, and Misc Fee 2) during a trip.
- Checking the box next to “Process Payments” enables the driver to run an “Authorize and Capture” transaction on a credit card through the DriverAnywhere system and have the passenger sign for it at the time of the transaction. NOTE: This feature is dependent on having a payment gateway set up in your Limo Anywhere system.
- Checking the box next to “View Full Rate Breakdown” allows the driver to see the full rate breakdown of the reservation.
- Checking the box next to “Disallow Cancel Reservation” prevents the driver from setting a trip to any canceled status.
- After selecting the tasks you want the driver to perform, click the “Update” button.
- Repeat this process for each driver.
Understanding Payroll Setup

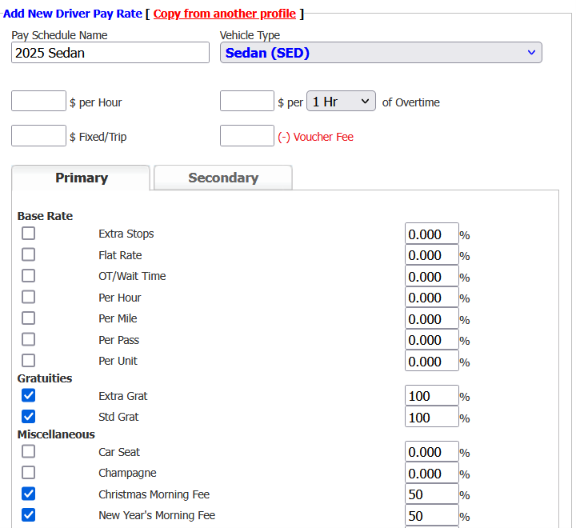
Limo Anywhere gives you the flexibility to pay your drivers a percentage of the revenue from customer charges, in addition to an hourly rate and/or a fixed per-trip fee.
NOTE: It's important to create only one payment schedule per vehicle type for each driver. This ensures the system can correctly populate the payroll fields on the settlement screen. If multiple schedules are created for a single vehicle type, it can create confusion, making it difficult to determine which schedule should be used.
If you're paying your driver a percentage of the fees/charges, enter the amounts here. Check the box next to the applicable rate and specify the percentage the driver will receive from each element of the total fee you bill the customer (ex. 100% of the gratuities paid out).
We'd love to hear from you! If you have any product suggestions or valuable feedback about our system, send an email to our Product Team at productteam@limoanywhere.com. Your insights are important to us!
Learn More:
- How-to Use DriverAnywhere 4.0
- How-To Go Through Workflow of Trip in DriverAnywhere 4.0
- How-to Set Up DriverAnywhere
- How-To Setup DriverAnywhere in Limo Anywhere
- How-to Set Up Driver Anywhere Access
- How-to Establish and Manage Drivers
- How-to Establish And Manage The Driver Groups List.
- How-to Set Up The System Rate Manager
- How-to Configure and Utilize SMS Templates for Drivers
Recent Posts

Limo Anywhere Stands with Our Industry – Supporting the Chauffeurs Who Drive Us Forward
Friday April 18, 2025
Turn Weekend Rides Into Repeat Business: How to Use Promo Codes to Grow Your Leisure Bookings
Wednesday April 16, 2025